Today we are going to tell you how you can generate analog output from Arduino. You can use this output to do various tasks. One of the most easiest and simplest thing is controlling brightness of an LED.
Background:
Arduino has several PWM pins. You can use this pins to vary the output . So once you are able to vary the output you can do several tasks. One of the most important application is controlling speed of the motors.
Hardware required
Connections
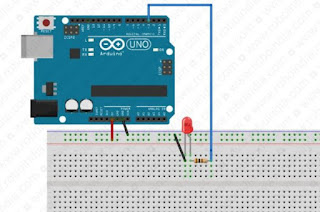
1. Connect one of the PWM pins say Pin 3 to 220 ohm resistor and then to +ve of LED
2. Connect -ve of LED toGND of Arduino
Code
int LED_ao = 3; // The LED attached to Pin 3 for analog output.
void setup() {
pinMode(LED_ao, OUTPUT); // Declaring Pin as output.
}
void loop() {
// Range of PWM is 0 to 255. So we are running FOR LOOP for 1 to 255.
for (int brightness=1; brightness<=255; brightness++) // For loop for Fade In effect.
{
analogWrite(LED_ao, brightness); // LED will glow for value of 1 to 255.
delay(20); // Small delay to see fade effect.
}
for (int brightness=255; brightness>0; brightness--) // Same FOR LOOP for Fade out effect.
{
analogWrite(LED_ao, brightness);
delay(20);
}
}
Happy coding. Cheers :)
Background:
Arduino has several PWM pins. You can use this pins to vary the output . So once you are able to vary the output you can do several tasks. One of the most important application is controlling speed of the motors.
Hardware required
- 1 x Arduino Uno
- 3 x Jumper wires
- 1 x Breadboard
- 1 x LED
- 1 x 220 ohm resistance
Connections
1. Connect one of the PWM pins say Pin 3 to 220 ohm resistor and then to +ve of LED
2. Connect -ve of LED toGND of Arduino
Code
int LED_ao = 3; // The LED attached to Pin 3 for analog output.
void setup() {
pinMode(LED_ao, OUTPUT); // Declaring Pin as output.
}
void loop() {
// Range of PWM is 0 to 255. So we are running FOR LOOP for 1 to 255.
for (int brightness=1; brightness<=255; brightness++) // For loop for Fade In effect.
{
analogWrite(LED_ao, brightness); // LED will glow for value of 1 to 255.
delay(20); // Small delay to see fade effect.
}
for (int brightness=255; brightness>0; brightness--) // Same FOR LOOP for Fade out effect.
{
analogWrite(LED_ao, brightness);
delay(20);
}
}
Happy coding. Cheers :)

No comments:
Post a Comment